Prikaz objav z oznako projects 2012. Pokaži vse objave

četrtek, 4. oktober 2012

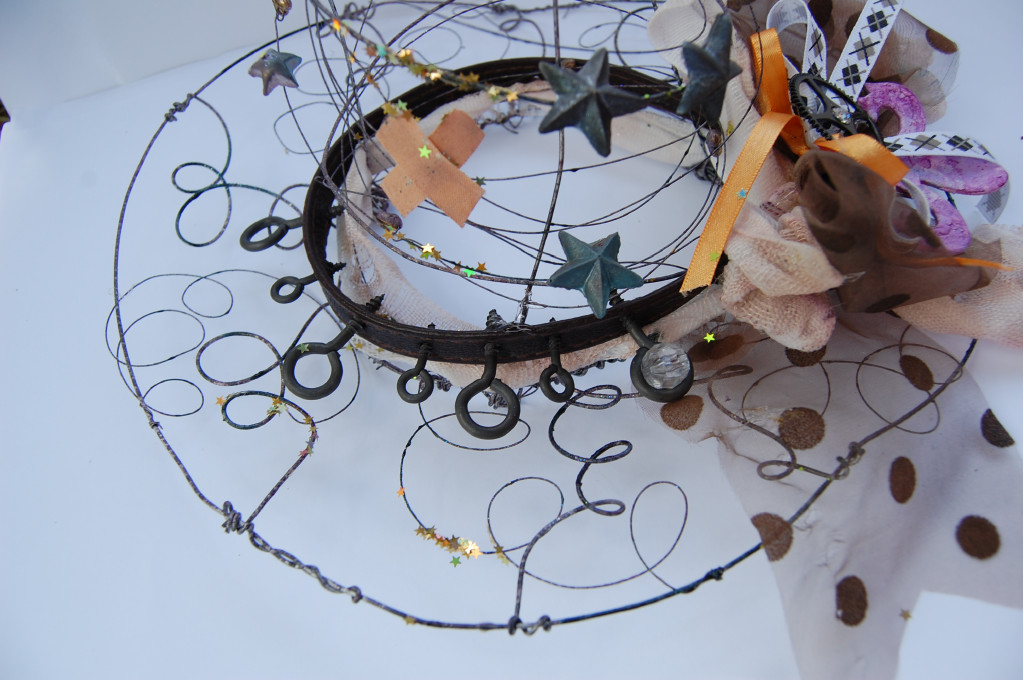
Invisible witch's hat

You probably already know that I love to invent new projects and this is sure something different to be combined with the Tattered Angels mists and paints. It’s a witch’s hat made out of Canvas Corp wire. I played with the wire by making loops and twirls and There I made an almost invisibile witch’s hat like my son said  when he first saw it. 
I wanted the mist to stay on the wire permanently so I first sprayed it with the clear spray and before it was dried I started to mist the hat. I couldn’t resist to apply with the bruh many Glimmer Glams  and Stained Glass paints that make the hat shinny. In fact in RL it’s a sparkle wire but here is just not visible enough but I can tell you that it is worth trying it! I also misted the little stars and other details.


Tattered Angels products used:
Glimmer mists (Abominable Snowman, Cupid)
Glimmer Glam ( Grandma’s house, Pixie Dust, Twinkle Toes)
Stained Glass (Purple, Green, Dark Turquoise)
7 Gypsies products used: Postale Paper, Amber Bottles, Mini Keys
CC products used: Decorative Wall Hardware


Have a nice day....See you soon!

sreda, 3. oktober 2012

Pale pumpkin


 Days are getting colder and this is the reason we have to get warmer and more kind. It’s time to surprise friends and family with some little present to make the darker autumn days more enjoyable and at Tattered Angels blog we plan a month of gift ideas and autumn inspired projects . My first project was a present for my mom. She likes red and I thought to make a pumpkin in nude colors with a special accent on the shadowing to give to the red embelishments the right importance. I started to with making a ball of smashed paper and than I covered it with …. diapers. Yes, they are perfect to make a soft surface and the shaping of the pumpkin it’s easy. Than I covered everything with the bandage and primer and this step makes the pumpkin hard and you can’t really tell what is it made for. I sprayed the pumpkin with the Chalkboard Sandy Beach  and then procedeed with the lighter colors (Chalk Chalkboard and Ivory Baseboard) to enhance the rounded pparts of the pumpkin. I also used the Glimmer glaze (Champagne, Icicle) to give to the pearls an anique look.


Tattered Angels products used:
Glimmer Glaze (Champagne, Icicle)
Baseboard ( Ivory)
Chalkboard (Chalk, Sandy Beach)
7 Gypsies products used: Gears Gems
CC products used: Decorative Wall Hardware

I'm coming back tomorrow with a second project.... an invisible witch's hat :-) and you are all invited!

četrtek, 3. maj 2012

Special delivery

Just a quick post for my last project for a little boy.  I love using these old tins and seem to me that I love them altered in different ways again and again and to me  they are perfect for any occasion. The tin is obviously a 3d card with a message at the back. The Tim Holtz's key saying "LIFE" was a perfect companion for the message inside the tin. All spiced with Prima flowers.


I'm so busy nowdays that I hardly find time to make something new but I promise I'll be back soon. Enjoy the hot days - here already feels like summer!

sreda, 18. april 2012

Do you remember my cardboard bunny? This time I made a similar project in another shape: a cardboard heart. You can see how mists donate a prescious touch to a simple cardboard shape. The Party Pink Glimmer Mist seemed to me perfect for this heart and the glimmer always surprises me with the unexpected placing- like two subjects are creating together: the glimmer and me!
Also the wire touch is essential in this project to make the heart more intresting. It's a simple thing to do and you can use it in million different ways: a birthday card with a message on the back, as a home decor, as a photo holder.... and more.


Have a great time and love and spoil!

četrtek, 12. april 2012

My Love

Hello everyone! How are you doing? I'm spending time doing some new things in these rainy days. I have a new challenge and I love it: I'm making the illustration for a book and I admit I'm totally in this project and beside this I'm also making some pieces of the scene for our next children play so I'm quite busy. At the same time I just love to dedicate some of my time to make a new idea.
Here is a heart, all covered with die cuts - locks. It's almost a romantic 3D card because I also put a heart shape tag at the back for a note! I love also these vintage metal combo from Making Memories and the Tim Holtz touch! Maybe that key will unlock the heart?


Have a nice day and make some new things!

ponedeljek, 2. april 2012

Happy Spring

Here's an idea how to recycle a cardboard box. Cut a desired shape out of the cardboard and make several of them using the first one as a pattern. Glue them together and decorate. It's easy, you do some recycling and the result is a nice and warm home decor.

So, don't throw away the cardboard boxes!!!! Go and invent new friends!


torek, 20. marec 2012

Surprise inside

Here is a cardboard egg. I paited it with a white primer and than misted with two glimmer mists (Gold and Suede). For painting the frame I used Golden Goddes Glimmer Glam. This is quick and simple but it has a great and prescious effect on a candle stand.


Have a nice day!

nedelja, 18. marec 2012

Glimmer hay egg

Here I am and today I'm sharing with you how to do my next project. I promise it's super simple. Take a lot of aluminum foil and shape it in an egg shape. Cover it with some fabric (just glue it on) . It's better to use a fabbric that somehow matches the final color of the project. Than start to wrap the thin hay (I don't really know the name of this thing but I'm sure is higly available in craft stores). The final touch is to spray the entire egg with Glimmer mist.
I misted with Apple and Gold Glimmer mist. In fact the egg looks a looooot more green and shiny in RL. Also the crown, a Regal Glimmer Chip, is misted with Sand Glimmer mist. The Letters and roses are painted with a mixture of Glimmer Glaze ( Plumeria and Pewter).


I told you it would be super simple! :-)

petek, 16. marec 2012

Ruffled Glimmer eggs

Lovely sunny days, hands in soil, warm breeze, children echos outside....how is possible not to make something....... Springy :-)
Here are my Ruffled Glimmer eggs. They're done with crepe paper stripes soaked in Glimmer mist. Once dried I made a lot of crepe paper flowers and assembled them in an egg shape. The final touch is a light misting with Gold Glimmer mist. I love them so much that I made a lot of these ruflled eggs.


Have a nice day and enjoy ruffling :-)